Android Studio is Google’s official Integrated Development Environment (IDE) programming language enabling developers to speed up and streamline the development process. The software equips developers with advanced tools that help them create high-quality, responsive applications compatible with every Android device.
Search engine giant Google announced the release of Android Studio at the Google I/O keynote conference way back in May 2013 and rolled out with the 0.1 version. The company launched its beta version 0.8 in June 2014. However, the first stable version, 1.0, was introduced in December 2014. Since then, Android Studio has become the leading IDE for native Android app development, replacing Eclipse Android Development Tools (E-ADT). Similarly, Kotlin became the preferred programming language for Android app development, replacing Java in May 2019.
Android Studio is powered by JetBrains' Intellij IDEA, enabling developers to speed up the coding and streamline workflow. They can download this popular app development software on all major operating systems, such as Windows, Mac, and Linux.
- What are the latest Android Studio versions and their fundamental features?
- Does Android Studio speed up the development process and help build customer-centric mobile applications, as claimed by Google?
- What are the strengths of Android Studio, and which are the areas that need improvement?
- Is Android Studio the best Integrated Development Environment Platform for building Android apps?
You will find answers to all the above questions by reading the in-depth 2022 review of Android Studio. This transparent and unbiased review results from thorough research carried out by the GoodFirms team.
A Complete Review of Google Android Studio

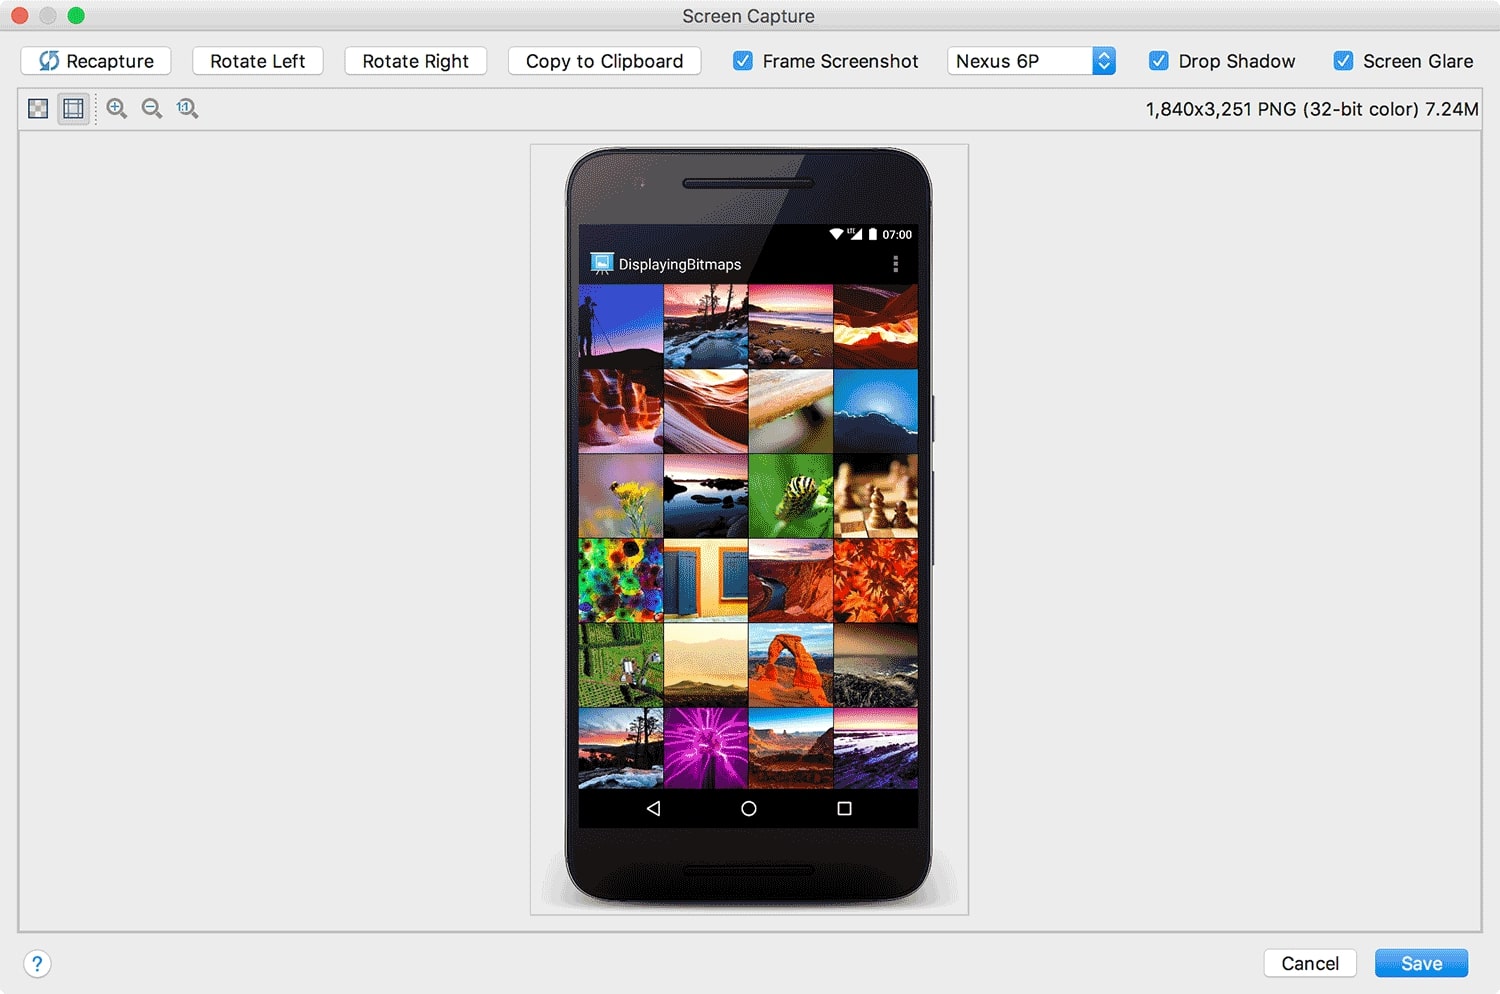
(Image Source: Android Studio)
Android Studio is a popular free-to-download integrated development environment software that provides a rich user interface and ready-to-use templates, which simplifies the task of app developers while launching a pad into development. They can create mobile devices, tablets, and Android TV technology.
Android Studio offers two types of preview releases. The preview release allows users to get early access to the latest feature and updates that are yet to be officially launched by Google. These are-
- Beta Build- The users can check out the new features that have been thoroughly tested.
- Canary Build- The users get access to the prominent features that have been lightly tested.
The latest Android Studio stable version is Android Studio Chipmunk I 2021.21.1, which supports JetPack Compose for creating apps and comes with Animation Preview to inspect and debug animation, whereas the Deploy Preview helps view UI within the Studio. It was released on May 9, 2022. The previous Android Studio stable version was Android Studio Bumblebee 2021.1.1, launched in April 2022.

(Image Source: GoAndroid)
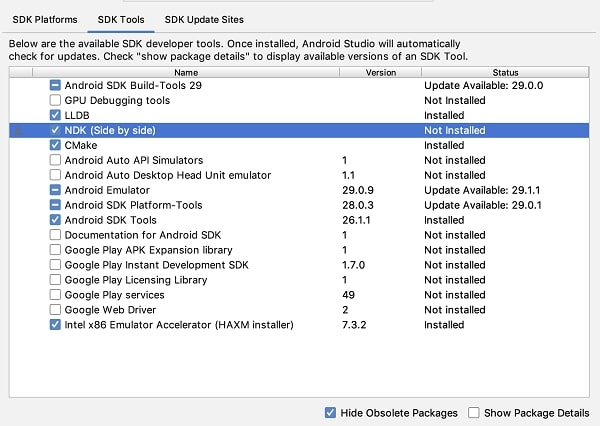
For the Canary and Dev channels - Android Studio Electric Eel Canary 2 is currently available
For the Beta Channel - Android Studio - Dolphin 2021.3.1 Beta 1 is now available.
For the Stable Channel - Android Gradle plugin 7.2 is currently available.
Android Studio Then and Now:
The stable release of Android Studio Version 1.0 kicked off with some of the best and most-wanted features like; First-run setup wizard, sample importing & templates, intelligent code editing capabilities, string translations, seamless option to edit and preview layouts across multiple screen sizes, languages, and API versions; memory monitor, unified build system, quick access to Google cloud services. In fact, the release statement back in 2014 also indicated plans to add more robust features in the future versions that will allow better testing and better support for development.
After almost eight years, Android Studio has optimized various functions and features to offer a unified environment where one can develop apps for all Android devices. From a flexible Gradle-based build system, fast emulator, GitHub integration, Lint tools, and live edits, to built-in support for Google Cloud Platform, this app development software has progressed to accommodate new possibilities for app development.
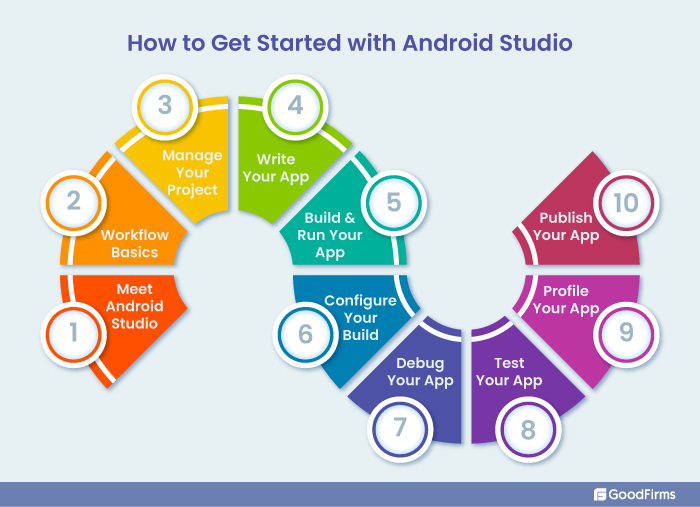
How to Get Started with Android Studio?
If you are planning to create an application on Android Studio for any device, you need to comply with the following steps. The first is gathering information about the basic features of Android Studio. This is followed by understanding the workflow basics, managing the project, writing the application, configuring the build, debugging, and testing the application. Once you are done with these steps, you have to profile the application to measure its performance and then finally publish the app based on your preferred platform.
Before going into the steps in detail, let’s understand the process through an image.
#1. Meet Android Studio Highlights the Basic Functionalities
Project Structure

A project in Android Studio is the actual workspace for developing an app. The actual structure of all the files can be easily viewed in the Project. The space has all the components related to the app development files in single or multiple modules. The developers can customize the view of their project files in the project view organized by modules to provide swift access to critical source files. These modules include Google App Engine, Library, and Android App.
The developers can view all created files under the Gradle Scripts containing folders like java, res, and manifests. The developers can view the customized project files and concentrate on specific features of app development.
User Interface
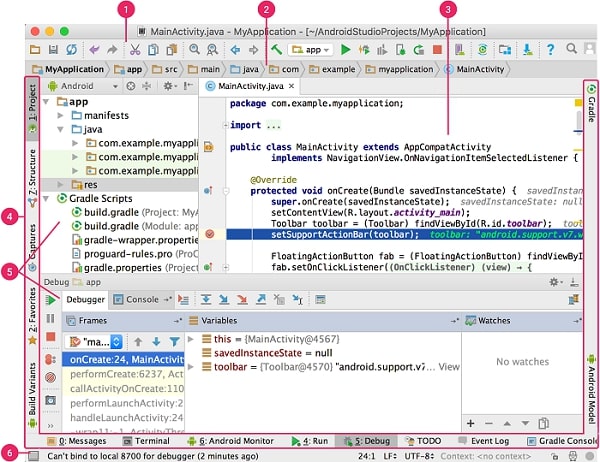
The main Windows page of Android Studio contains various logical areas. These include the toolbar that allows you to perform varied tasks, such as running the application and releasing the Android version. Similarly, the navigation bar lets you navigate through projects and open files that you want to edit. It offers a more compact view of the project structure. If you wish to edit or develop the codes, you can use the editor window, whereas the tool windows provide access to specific projects or task management. A tool window bar runs externally from the IDE windows and has buttons to expand or close individual tool windows. You can check the project status using the status bar. It also includes any warnings or messages if there is an error in coding. Android Studio allows you more screen space by moving and hiding the toolbars and arranging the main window.
Tool Windows
Android Studio has been designed to understand the context of developers and automatically provide them with the relevant tool windows. The frequently used tool windows are pinned at the top and can attach, unpin, drag, or detach the tool windows. These tool windows can also go into the Distraction Free Mode, where all toolbars and editor tabs are hidden.
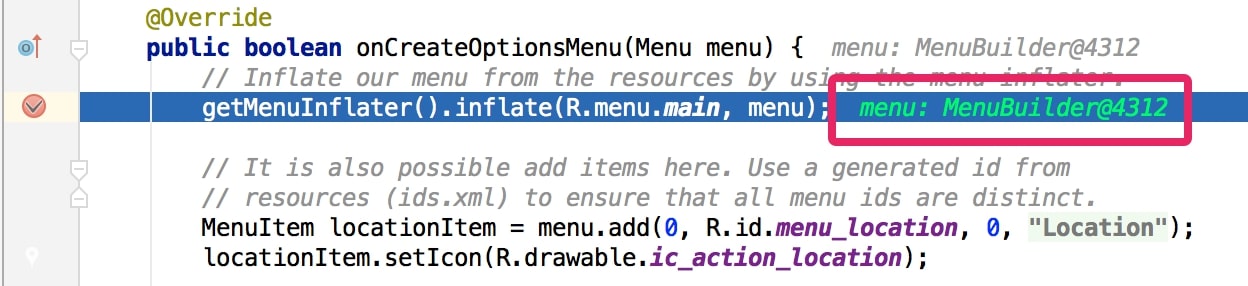
Code Completion
Android Studio offers three code completion types: Basic Completion, Smart Completion, and Statement Completion. The first type of completion deals with the primary variables, expressions, and methods, while the second completion shows relevant options. The Statement Completion helps complete the statement or missing codes. It is familiar with data flows and types.
Find sample code

Android Studio provides an extensive array of sample codes that helps to speed up the development process. All these various sample codes help to create app components, whereas the templates play an important role in building new app modules and other specific app components. The sample browser helps to select the sample preview and import the same as projects and the code sample browser enables you to search the Android code samples related to the recently highlighted symbol in the project.
Navigation
As the name suggests, this feature helps you seamlessly move around or navigate through Android Studio. You can move through the recently viewed files with “Recent Files Action.” You can access the last viewed files by default. You can view any window tool from the left column. The file structure action displays the current file's structure and allows navigation through any portion of the existing file.
“Navigate to Class” action allows you to navigate a particular class after searching for it. The feature supports refined expressions, such as paths, camel humps, middle name matching, line navigating, etc. You can see the results of the project classes by calling them twice in a row. Use the “Navigate to File” action to navigate through a file or a folder. The “Navigate to Symbol” action lets you go through a field or method by name. From the current cursor position, you can search the codes referring to the classes, field, statement, method, etc., by pressing Alt+F7
Style and Formatting

You can format and apply styles automatically in your codes while editing. You can customize the code style settings using the specified conversations and programming language for spaces, blank lines, braces, tabs, intent, etc. You can even use the Reformat Code action or auto intent on all lines while developing the applications.
Version Control Basics
Android Studio supports different version control basics, such as GitHub, Google Cloud Source Repositories, Git, Mercurial, CVS, etc. The VCS menu shows various version control options depending on the selection of the system. Once the application gets migrated to Android Studio, the VCS menu option supports creating a repository. You can also migrate the new files to version control for conducting other control activities.
Gradle Build System
Gradle is the fundamental and integral part of the Android Studio Build system and the Android plugin for Gradle. It provides Android Studio with more robust functionalities. The build system will configure, customize, and extend the build operations. The command line allows the build system to run independently, whereas the Android Studio menu runs as an integrated tool. You can even build several Android Application Packages (APK) to support the application containing multiple features and utilizing the same modules and projects. You get the option to reuse the resources and codes across sourcesets.
Gradle’s flexible behavior allows you to accomplish all these tasks without changing the application’s source code. You can name the Android Studio to build files as build.gradle. Android Studio automatically generates the build files while importing a current project.
Build Variants
You can use the build system to develop different versions of the same application while working on a single project. The feature proves handy when you are using the free and the paid versions of the app. You can even dispense various Android application packages for different device configurations on Google Play.
Get Multiple APK Support
You can build multiple Android application packages with multiple APK support depending on the screen density or ABI. There is also a possibility of building separate APKs for an app to get different screen densities like mdpi and hdpi. You can take them as a single variant to test and share APK and ProGuard settings.
Resource Shrinking
It is an explicit feature that automatically eliminates all the unused resources from the library dependencies and packaged applications.
Dependencies Management
Gradle helps search the dependencies and makes them accessible in the build. You can manage different dependencies in the build, including local binary, module, and remote binary.gradle file. The project configuration occurs when you use the Maven Central Repository by default.
Debug and Profile Tools
Android Studio plays a constructive role in debugging and improving code performance with the help of performance tracking tools and inline debugging. It brings us to the discussion to know what inline debugging is.
Inline Debugging
It focuses on improving the code performance in the debugger view. It verifies the inline expressions, variables, values, and references to tooltip values, method return values, Lambda, and operator expressions referencing a selected object.
Performance Profilers
The performance profile is an enhancing feature that helps you quickly and efficiently track the application’s memory and CPU usage. You can also use this feature to search for deallocated objects, improve the graphic performance, find the location of memory leaks, and track network requests.
Heap Dump
Android Studio allows you to profile memory usage and start garbage collection simultaneously.
Memory Profiler
The feature monitors the memory allocation and location of allocated objects while performing some specific tasks. The allocation plays a significant role in optimizing the app performance and memory usage through adjustments in the method calls.
Data File Access
You can conduct in-depth application analysis in performance and debugging using Android SDK tools like logcat and Systrace. Also, use the Captures tool window to view the available data files.
Inspecting the Codes
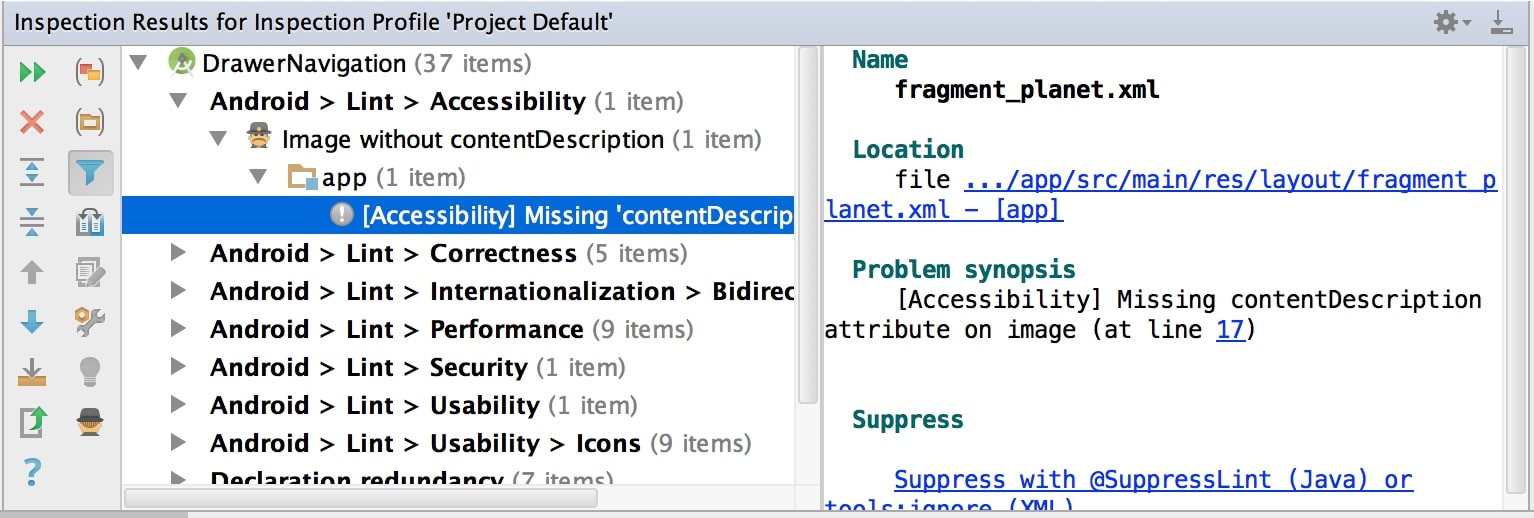
While compiling the program, Android Studio started running the IDE inspections and configured Lint automatically. This helps you to find out and modify the issues related to the code’s structural quality. The Lint helps identify the potential bugs in the Android project source files and fortifies the app's security, optimizes performance, and improves accessibility and internationalization. Android Studio inspects IntelliJ code and validates annotations to enhance coding workflow.
Annotations in Android Studio
As indicated earlier, Android Studio validates annotations to streamline coding workflow and detect bugs like a null pointer.
Log Messages
The Logcat window of the Android Studio displays the adb results and device log messages while creating and running the application in the IDE tool.
Performance Profiling
The Android Profiler helps profile the network performance and the application’s CPU memory.
Signing into Your Developer Account
Once you have gone through the basic features of Android Studio, it’s time to sign in to your developer account so that you can get additional support and tools to complete the authentication process. The tools include App Action Test Tool and Cloud Tools for Android Studio. You are also permitting Google to access and manage your data by signing into the account.
Installing Android Studio
Next, you need to download the latest version of Android Studio and install the same on whichever operating system you are using; Windows, macOS, Linux, or Chrome. The system requirements for downloading the IDE tool have been discussed below in this article.
Migrating to Android Studio
If you are planning to migrate your project from another IDE to Android Studio, for example, Eclipse to Studio, you need to adopt a new project structure and IDE functionality. The Eclipse to Studio migration requires importing a tool that quickly moves the codes to Android Studio and Gradle-build system.
Android Studio Configuration
Use the Java Development Kit and system RAM as Android wizards to configure the system requirements. You can also configure the Android Virtual Device, which acts as the default settings. To customize Android Studio, you need additional system configurations.
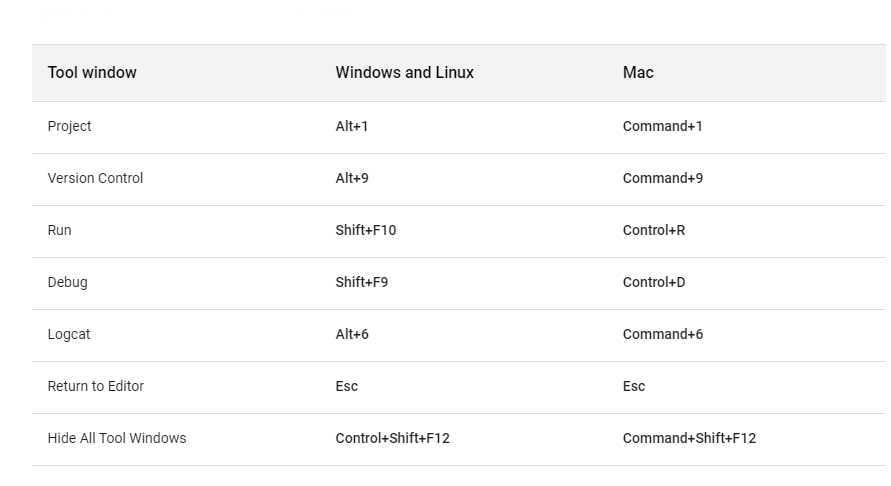
Keyboard Shortcuts
Android Studio has provided several keyboard shortcuts to easily and quickly perform common actions.
Accessibility Features
It includes screen reader compatibility and active support for screen readers based on different screen sizes. It is recommended that you should use NVDA 2015 or higher version screen reader to get Android development support with a 32-bit JRE on the machine. Do not use the JAWS screen reader as it may lead to performance bottlenecks and navigation issues. Also, do not use Windows Narrator as it is not compatible with the Java programming language.
Update IDE Channels
We have already discussed the different channels that Android Studio uses to release the various app versions. These include the Canary and Dev Channels, the Beta Channel, and the Stable Channel. For more information, you can refer below.
#2. Workflow Basics
Android Studio workflow requires you to follow and implement the same steps as in the case of other IDE software. You need to execute the following steps to develop an application. The steps include-

- The first step includes setting up the workspace, which starts when you have already completed installing the Android Studio and creating the project.
- The next step is to write the app using a plethora of specialized tools that help you code faster.
- The Build and Run phase is one where the project gets converted into a debuggable APK package so that you can run and install the emulator. It is the same phase that allows you to customize your build.
- The fourth step is debugging, profiling, and testing the app with the aim of making it bug-free and optimizing its performance. You need to carry out all the tests efficiently to accomplish your goal. You can view the performance profiling tools to evaluate the various performance metrics, such as CPU impact, network traffic, etc.
- The last step is publishing the app, but you also need to name the specific app version. You also need to build an App bundle and sign it with a key.
#3. Project Management
The Android app development project includes all the tools, such as the app workspace, the source code, the test code, build configurations, and other critical assets to develop an app. Android Studio builds the required structure for all files and they become visible in the project window. There are a few vital components included in the project. These are-
Module
The module feature helps you segregate your project into discrete units of functionality by source file collection and build settings. The project may include one or more modules where the other module can serve as a dependency. There are different types of modules.
- Android App Module- It basically offers the source code, app level settings, and resource files when you start creating an app. It further includes phone & tablet modules, glass modules, Android TV modules, and Wear modules.
- Feature Module- It helps you create a modulized feature of the app supported by Play Feature Delivery. It proves handy if you are creating specific features for the on-demand apps.
- Library Module- It provides a container if you are reusing the code. The reusable code can be employed as a dependency in other app modules. The difference between a library module and the app module is that the former builds a code archive file, while the latter builds an APK. There are two types of library modules - Android Library and Java Library.
- Google Cloud Module- It offers a container for Google Cloud backend code. It makes use of the HTTP Cloud Endpoints and Cloud Messaging to establish app connection with support from Java App Engine code and dependencies. The feature is used to develop the app backend.
Project Files
Android Studio shows your project files in the Android view by default. The modules and file types organize the view to make navigation easier for project key source files and uncommon file directories. The structural change on the disk is reflected in the project's build-related configuration, manifest files in each module, and all alternative source files grouped in one place.
Project Structure Settings
When you open the project structure dialog to make changes in the project, you will come across different options, such as SDK locations, modules, and projects. The SDK location defines the location for Android SDK, Android NDK, and JDK projects. The module lets you change the configurations for each project module.
Create a Project

Android Studio has simplified creating projects for different types of devices, such as tablets, phones, wearables, and TV. After opening Create a Project wizard, you have selected the type of project from the categories available. Once you have done that you need to configure the project settings by specifying the name, the package name, and the saving location. You need to choose a lower API level to support the app and use AndroidX artifacts to view the AndroidX libraries. Click on finish when you complete the project.
Play Feature Delivery
The feature makes use of the Android App Bundles to generate APKs and optimize them so that the apps can conditionally be delivered or downloaded on demand. The users can only download the code and resources. To achieve your task, you have to separate the features into feature modules from the base app.
Adding C & C++ Code
To add C & C++ code to your project, you need to place the code in the cpp directory of the project module. The code gets compiled with a native library, which Gradle packages with the app while creating the project. The Java Native Interface supports Java and Kotlin code to add the native functions of a library.
You have to download the build tools like CMake and LLDB and Android Native Development Kit. All these components help you manage native activities, build native libraries, and debug native code.
Building a new project using native code is similar to that creating projects in Android Studio. The only additional step that you need to take is selecting a Native C++ project. Next, you have to create and run a sample app and build new C or C++ source files.
Installation & Configuration of NDK and CMake
You can install the NDK and CMake automatically with the help of Android Gradle Plugin 4.2.0 or higher version. However, you need to ensure that Google must accept their licenses in advance. Android Studio always chooses the latest NDK version while installing it. You can also download the specific version if you need it.
For the NDK configuration, you need to use the ndkverion property. But you must note not to set any property for the version because Android Studio downloads the default NDK version automatically.
For CMake configuration, you need to open the project pane and choose the project view and click on the root directory of the module and enter the filename as ‘CMakeLists.txt’. It helps to create a plain text file. You can also use NDK libraries and other useful native APIs in the project script file. Android Studio offers prebuilt NDK libraries as well so that you don’t have to create them or package them.
Connecting Gradle to Native Library
If you want to link Gradle with the native library, such as the external CMake, the best way is to use the Android Studio user interface. Next, you have to manually configure the Gradle, which helps you to connect the native library to the module-level file and configure it. You need to highlight optional configurations and ABIs in addition to including prebuilt native libraries.
Create Android Library
To create an Android library, you need to build an Android module as both are structurally the same. You can create a Java module by building a Java library that creates a JAR (Java Archive) file useful for several projects. But the JAR file doesn’t allow you to use the Android resources or manifest files.
You can add dependencies to the project structure or utilize the library in some other project. There is an option to add both Java Archive and Android Archive as dependencies. Now, your next job is to select the resource and make it public.
Continuous Integration
Through continuous integration, you can create and test your app automatically and checks the updates related to the source control system. You can choose to use any continuous integration system that enables a Gradle build to create Android Studio projects.
#4. Write Your App
Writing an application involves writing the codes, designing the layouts, and adding interactive images. The process begins with code completion that aims to accelerate development and minimize errors in coding. You also have to name variables and check the class method. The next step is building customized code-completion templates where you enter snippets of code for smaller code chunks. You can even enter live templates by typing its abbreviation.
The Lint tool helps you to detect and rectify the issues with the structural quality code without writing or conducting app tests. The Lint also helps to discover bugs and remove the same to optimize app performance.
Android Studio lets you build and manage the resource files by creating images that support all screen densities. It previews the images and colors to verify the icon reference. There is an option to create new layouts, while the Translate Editor tool allows you to see all translated resources in a single view. It simplifies the translation process and easier to make changes.
Add Code from a Template
To add code from a template, you need to turn to the project window and choose the template from the available lists. While selecting the template, you also need to add a wizard window that asks for the configuration of the component. You have to add a new activity to a current app module.
Add Module to New Device
You need to go to the menu option and choose a new module and select a device. Then the new module needs a configuration, following which you need to select an apt code template. Enter the settings of that template activity
Build a Java Class or Type
Android Studio helps you to create new Java classes, different types of interfaces, and annotations, in addition to Enumeration and singleton classes using file templates and creating new classes dialog.
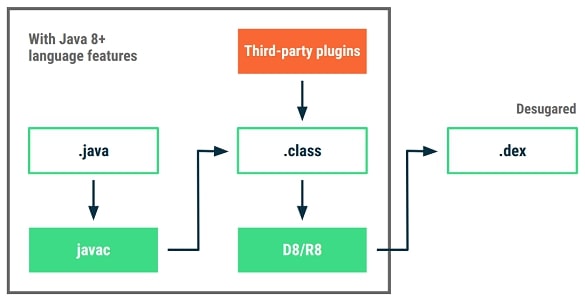
If you are using Android Studio version 3.0 or a higher version, you will get full Java 8 features support. These features include Lambda expressions, Method references, Type annotations, Repeating annotations, etc.
Google’s official IDE platform also supports Java 8+ APIs without having minimum API level requirements. This is known as API desugaring, which includes standard languages.
Add App Resources
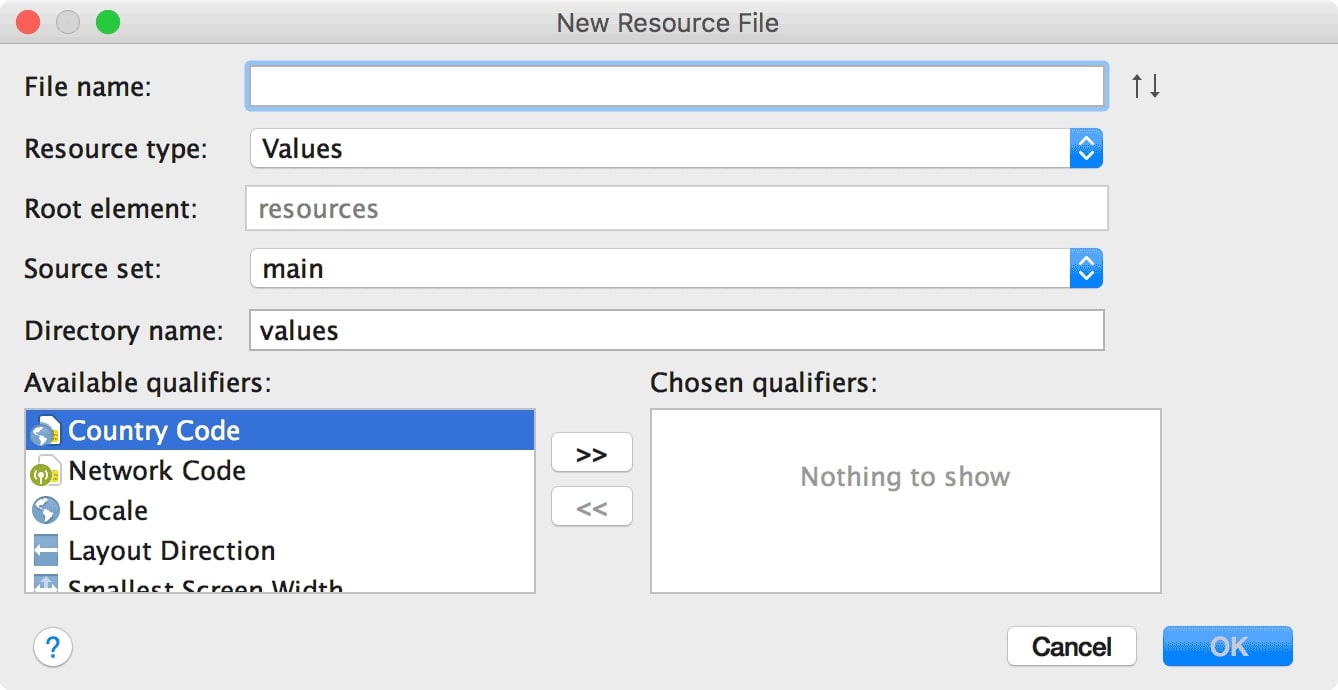
Before adding the app resources, you need to determine the type of resource you want to add. The bitmaps and layouts are the app resources, which are organized into specific directories. You can even add an alternative version of every file to various device configurations. First, add an XML resource file, followed by adding the resource directory. You can also change the resource directory.
Layout Editor

The layout editor helps the designing team to create an interactive and intuitive app user interface by dragging the UI elements. The design editor previews the layout on different device screen sizes and resizes it to fit the requirements.
Use Motion Editor to Create Animations
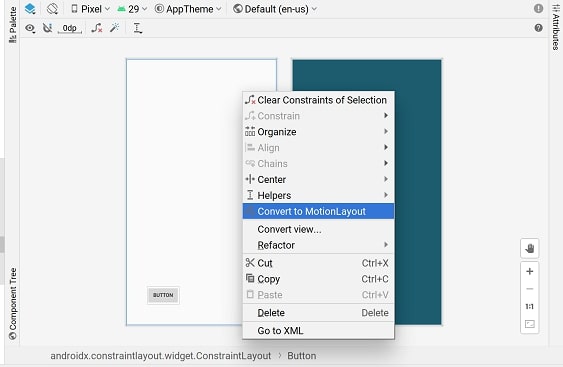
The visual design editor of Android Studio includes MotionLayout to build and preview animations. The motion editor has a simplified user interface with manipulating elements that act as the foundation for creating animations.
App UI Resource Management
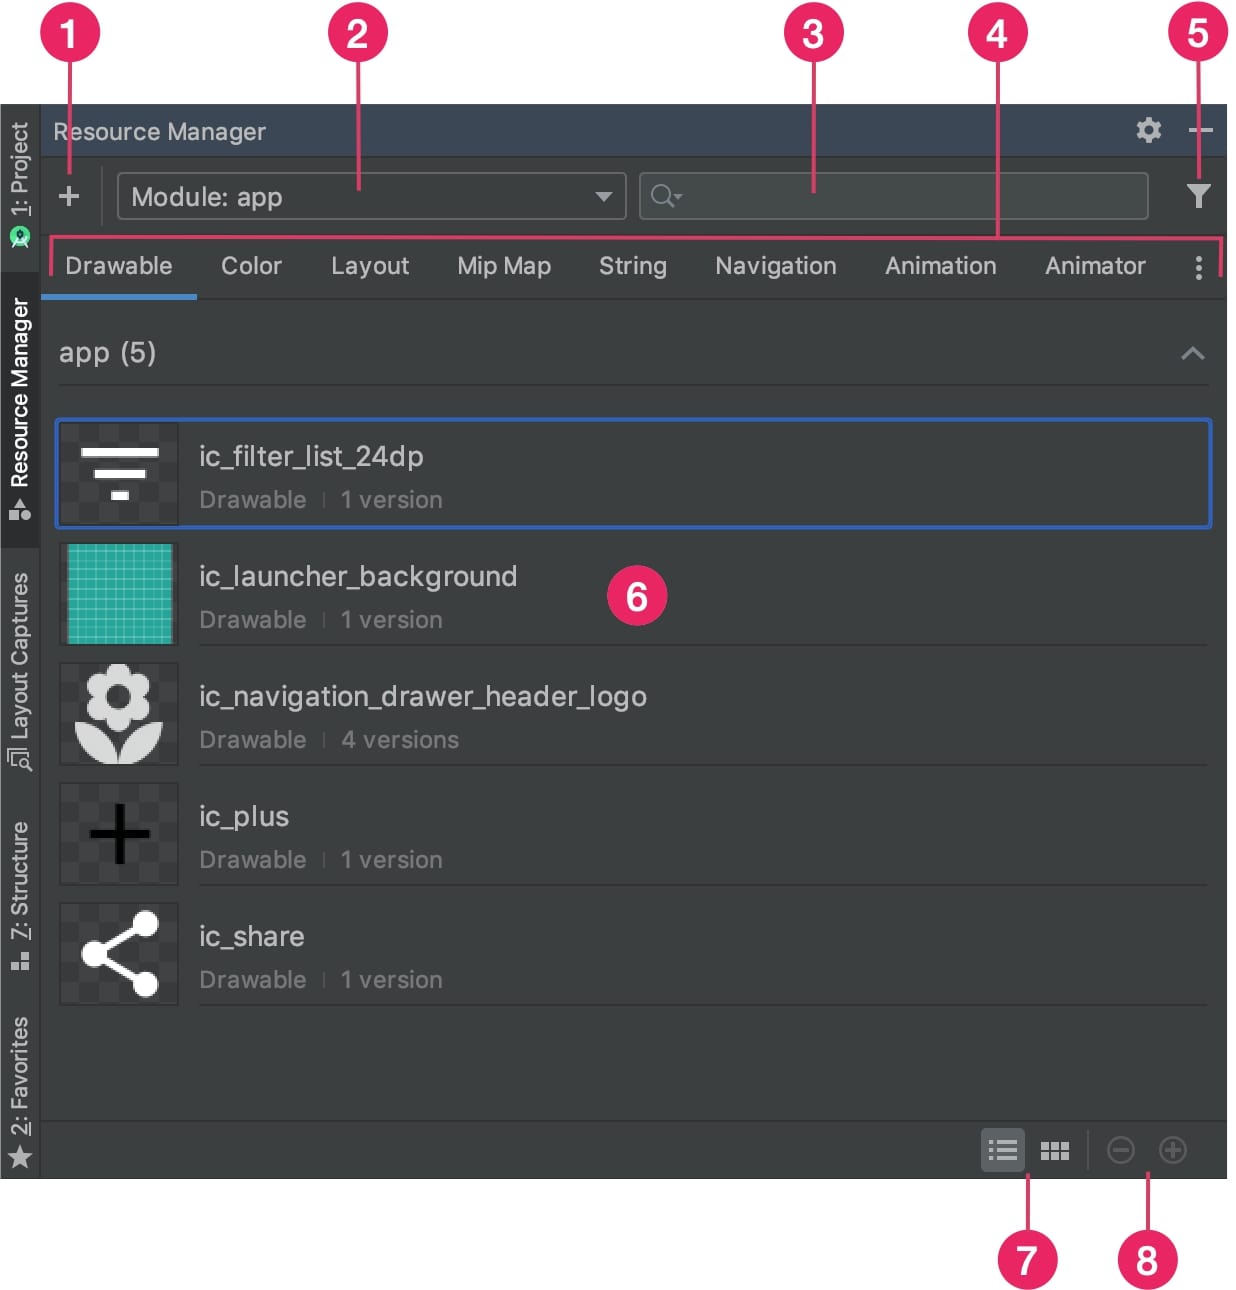
Android Studio provides a resource manager that can help to manage and efficiently use the app resources. You can import drawables in your project through drag-and-drop resource files and automatically parse drawable densities. The software also allows you to directly drag and drop drawables in the layout.
Theme Editor
Use the theme editor feature to create app themes and adjust them based on different resource classifiers. It also visualizes the impact of color changes on common UI elements.
Multi-Density Vector Graphics
The Vector Asset Studio tool enables you to import Adobe Photoshop Document and Scalable Vector Graphic files in your project in addition to adding material icons. The Vector Graphics can minimize the size of the APK and you can reuse the same file for different screen densities without compromising the image quality.
9-Patch Files

For creating resizable bitmap images and effectively adjusting the content on the app device screen, you can use the 9-patch tool, which is a WYSIWYG editor.
WebP Images
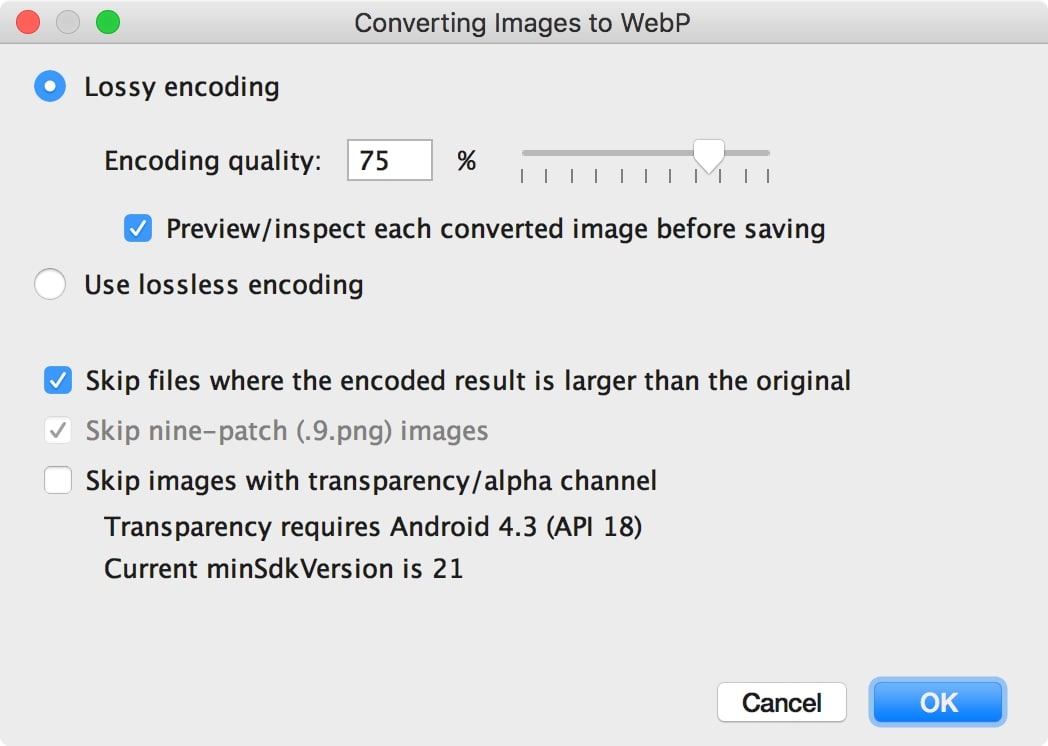
It is an image format from Google that includes the elements of JPEG and PNG, such as lossy compression and transparency. WebP images have improved compression abilities. Hence, you can convert images to WebP format and also from WebP to PNG.
Localize UI
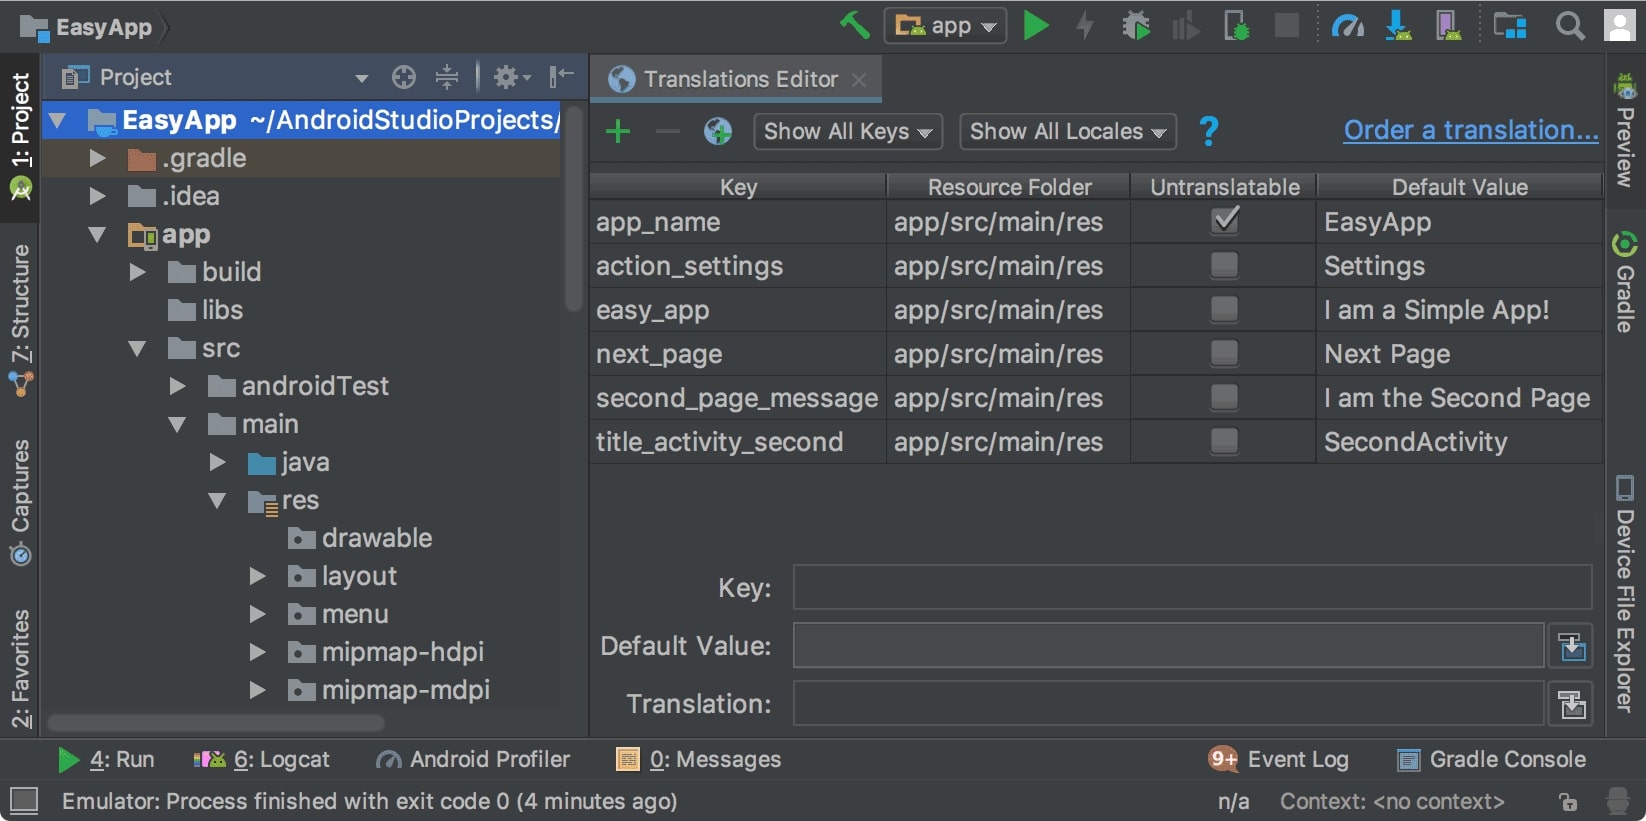
You can localize the user interface with the help of Translations Editor, which provides a comprehensive and modified view of translated string resources in default mode. A string resource is a tool that translates the default language of the app to a language that you wish your app to accommodate.
Android App Links

They are the HTTP URLs that allow users to directly come to your website or get across the app. Google has specifically added this feature to generate more traffic and ensure more and more customers read your app content, download, and install the app.
Connect to Firebase
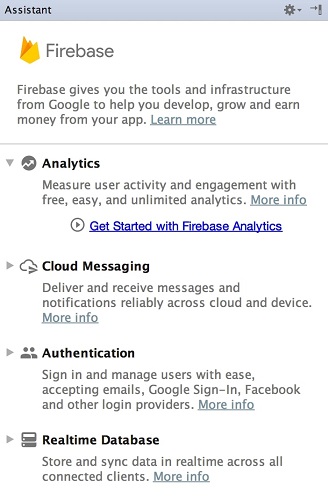
Firebase is a mobile tool that enables you to create advanced and optimized applications so that it provides improved opportunities for generating more revenue and increasing the app customer base at the same time. You can align this feature with Google Analytics for Firebase to match your requirements.
*** Please note that the other features, code inspection, and code improvements have been already discussed above.
#5. Run and Build Your App
You can deploy new projects on the Emulator or set up the projects on a device. After the app installation, you can make changes to add a specific code or resource without support from a new APK. If Android Studio detects an error in the device, it sends a warning before launching the project.
Android Studio also uses a default run configuration if you are running the app for the first time. This activity informs you whether the app development has to take place from Android App Bundle or APK.
You also get a debug version of the app by default, which you can use during the development process. To change the build variant, click on the Active ABI column and select the required variant from the list.
The Run button creates and deploys the app into the desired device. But to upload the app to the Google Play Store, you need to select one more option in the Build menu and ensure that you have chosen the desired build variant first. After completing this task, it’s time to track the Build process. It also provides the live edit option recently added in Eel Canary 1.
The option of Live Edit has been introduced to view the impact of composable updates in real time. The feature upgrades the compose preview and modifies the codes of the device or emulator. It allows designers to create faster UX as they don’t have to wait for deployment completion. But it does not provide method signature changes, class hierarchy changes, and does not add new methods.
Once the editing is done, apply the changes. You can change code or resources without restarting the application.
Run App on Emulator
You are already familiar that Android Studio Emulator plays a critical role in application testing on different devices and accelerates the entire process. But you need to fulfill certain criteria before carrying out the tests; those related to system requirements.
For example, SDK tools must be 26.1.1 or higher versions along with a 64-bit processor, and CPU supporting unrestricted guests. Apart from these, you also have specific hardware requirements.
Upon completing these requirements, you can install the emulator and run it directly on physical or virtual devices.
Create and Manage Virtual Devices

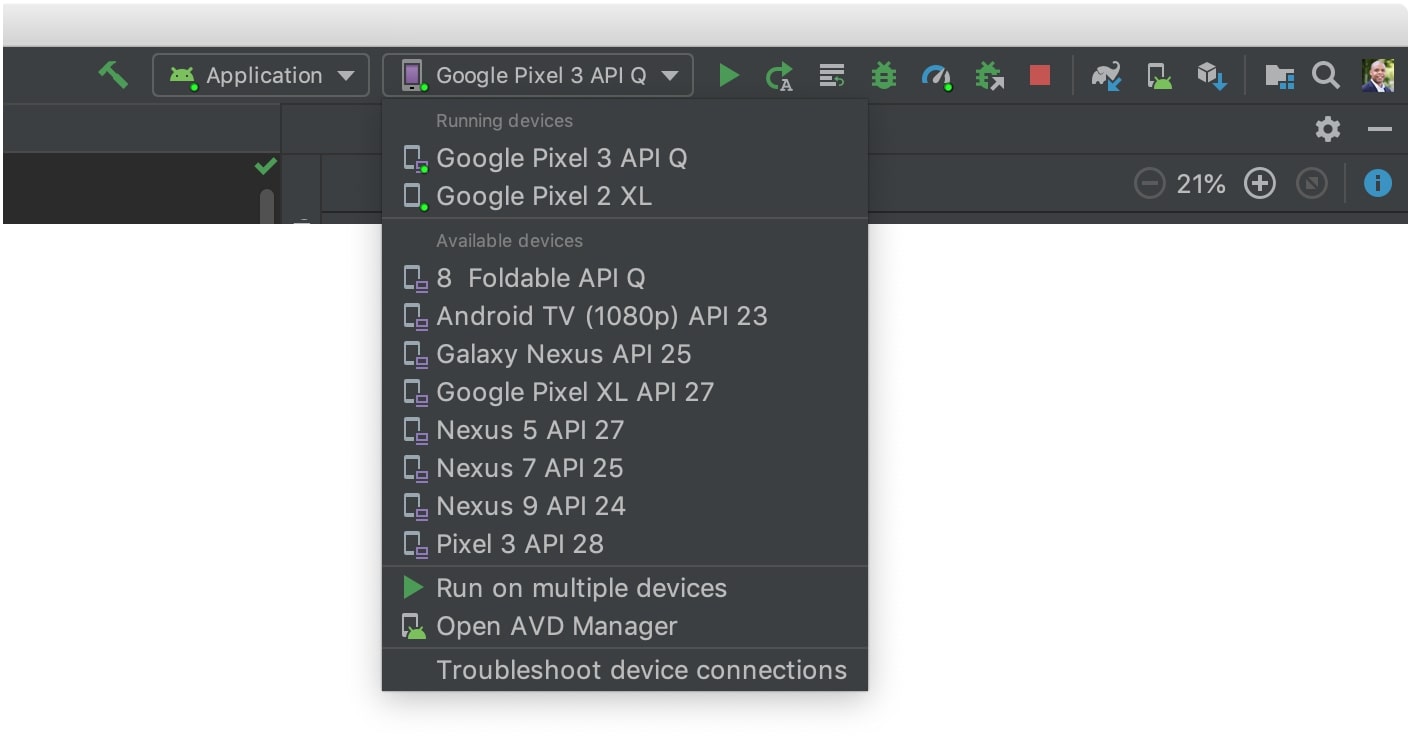
(Image-1 Select the Virtual Device Manager )
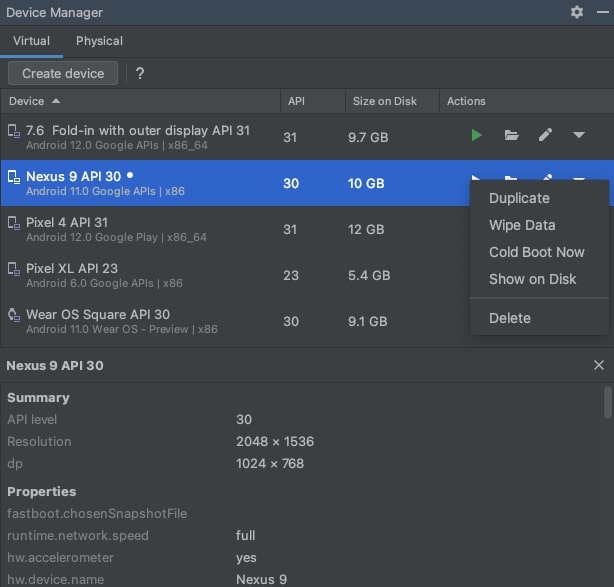
(Image-2 Select the Device Manager)
The device manager creates and manages virtual and physical test devices. The virtual tab includes creating a new device, analyzing the device, or eliminating the device from AVD Manager. When it comes to the physical tab, select the ADB Wifi to pair the device, check every physical device's details, and use Device File Explorer to scrutinize every device file system with a single click.
You also need to check hardware requirements, system images, skin, and available storage before building the Android virtual device.
Starting Emulator from Command Line
To start the emulator from the command line, you have to first install the application and get familiar with default directories and files. There are a few common command-line startup options, such as -no-snapshot load that helps in cold booting and saving the emulator on exit. Also, there are some advanced options like bootchart timeout that perform bootcharting with timeout in seconds.
Emulator Console Commands
The console feature manages the port redirection, telephony events, and network features when you are running the app on the emulator.
Establishing the Android Emulator Network
The emulator enables you to establish a complex testing and modeling environment for the application. The task is achieved through the following network architecture and capabilities. These include providing a network address space, local networking limitations, using network directions, configuring emulator DNS settings, interconnecting emulator instances, and sending SMS or voice call to another emulator instance.
Configure Hardware Acceleration
The Android Emulator uses graphics and virtual machine hardware acceleration features to improve the emulator’s performance.
Comparing the Various Emulator Features
You need to compare the different Android Emulator tools that are used in Console, Command-line startups, AVD manager, and user interface control. The parameters for comparison include Home, Back, Menu, Zoom, Battery, Phone, and many more.
Troubleshoot Emulator
To identify the known Andriod Emulator issues, you have to troubleshoot them. The troubleshooting will check whether the emulator has adequate disk space to mitigate crash issues if the antivirus software is up-to-date, and free RAM, check if the emulator is still slow after an update.
Run Apps on Hardware Device
It is highly recommended that you should certainly test your Android device and app before making a final release to end-users. To accomplish your task, you need to set up a development environment to test and debug the device over Android Debug Bridge.
Install OEM USB Drivers
Those who are developing the Android app on a Windows platform, need to install a USB driver to test the device. You will also get several authentic websites providing original OEM manufacturers from where you can easily download and install the USB drivers. These include all the popular mobile and laptop brands like Aser, Asus, Blackberry, Dell, Samsung, Lenovo, HTC, and many more.
Install Google Driver
If you are using Windows for app development and willing to debug adb with Google devices, you need to install a Google Driver.
Build, Edit, Run & Debug Configurations
Android Studio carries out a run/debug configuration to identify how to perform an operation when a user runs, debugs, or tests a code. There is also an option of changing and building new configurations or modifying the default templates.
Create the App Using Command Line
Android Studio allows you to perform all the build tasks and actions directly from the Gradle wrapper command line tool, available at the root of each Android Studio project.
#6. Configure Your Build
The advanced build toolkit Gradle helps in automating and managing the build process so as to create customized configurations. Every configuration consists of codes of resources, a few of which are common to all app versions. Gradle also provides configuration settings and processes, useful to create and test specific Android apps.

The build process includes various useful tools, such as compilers and packagers that convert the project into Android App Bundle or Android Application Package. If you want to create customized configurations, then modify one or more build configuration files. You can configure different types of build files, such as the Gradle setting file, Gradle properties file, top-level build file, and module-level build file.
Configure App Module
It is critical to configure the app module settings so as to toggle the app. The process enables you to modify the application ID to create configurations and make adjustments in the namespace free from the application ID.
Add Build Dependencies
You can include library modules and external binaries as build dependencies located in remote repositories or the machine. There are different types of dependencies like local binary, local library module, remote binary, and native that need a configuration on how to use the dependency.
Configure Build Variants
Configure build variant feature is a crucial step in the app development process as it allows you to build various app versions from a single project. Here, you can also efficiently manage dependencies and signing configurations.
Android Gradle Plugin Upgrade Assistance
The AGP Upgrade Assistant quickly upgrades the Android Gradle Plugin version used in the project. Google keeps adding new features in AGP regularly to configure the build so that it can be used by other Gradle plugins. The AGP Upgrade Assistant is used for updating the older version of AGP build files to new editions, ensuring the usage of the latest Gradle and third-party plugin versions.
Gradle Tips and Recipes
It is highly recommended that developers should know how to effectively manage the project configurations and resources using the Gradle build system. It includes making changes to the default source configurations, configuring project-wide properties, managing dependencies and libraries, building different app versions, combining different product features, filtering variants, testing the app, and lastly optimizing the build.
Migrating to Kotlin Script
Android Gradle plugin version 4.0 and higher will now fully support Kotlin Script (KTS), in place of Groovy for Gradle build configuration. However, you need to convert and migrate one project at a time from Groovy to Kotlin and ensure that your project complies with the build file after migration.
Optimize the Build Speed
The developers have to increase the speed of their build process. They can opt for two ways to accelerate the build speed. First is optimizing the build configuration by immediately ensuring the steps that take advantage of Android projects. Secondly, profile your build that helps to detect the complex loopholes related to any project and diagnose them properly.
Troubleshoot Build Performance
Android Studio provides a Build Analyzer that helps you to determine and evaluate the build performance of the project. The Build Analyzer prepares and displays the report every time depicting the latest data in the Build window. The tool also discloses data related to plugins determining the build’s duration. It also sends warnings if it detects tasks with improper configurations. To use this feature, you need to have Android Gradle Plugin 4.0 version or higher.
Profile Build
If you are working on a large complex project or building an application that requires several customizations, profiling helps you to find out how much time Gradle takes to execute each build’s lifecycle. You need to use a Gradle Profiler tool to gather profile and benchmark information for Gradle builds. You can profile various CPU/memory settings, Gradle plugin versions, an incremental build, etc.
Maven Publish Plugin
In this process, you have to publish the libraries so that it becomes easier for developers to implement them in their apps. It includes four main steps; preparation for library release, a configuration of publication variants, configuring the test fixtures to publish and uploading the library.
Managing the Manifest Files
The build tools help in ingesting the manifest files, which decide the ultimate appearance and experience of an application. You need to merge multiple manifest files and priorities in addition to conflict heuristics and rule makers. Then you have to inspect the merged manifests and search for conflicts if any.
Shrink the App
If you want to develop an application of a smaller size, then you have to shrink it. To shrink your app, you can remove unused resources and codes. Also, there is an option of obfuscation, which minimizes the app’s name depicting its classes and members. You can even select the optimization process, which inspects and rewrites the code to reduce app size.
Enabling Multidex
If you see that your app libraries and resources have increased by more than 65,536 methods, you can come across an issue indicating that the app has reached the maximum Android build architecture. But you can enable an app configuration known as multidex, which helps in creating and reading several DEX files
Extend the Android Gradle Plugin
AGP contains extension points for the plugins. It helps to extend the functionality of the plugin through new steps synced with standard build tasks.
Integrate Customized C/C++Build System
Integrating a customized C/C++ build system helps all those who are focusing on multiple platforms to generate projects for each of the platforms.
#7. Debug Your App
Android Studio provides a debugger that enables you to choose a specific device for debugging the app, setting up the breakpoints in your programming languages like Kotlin, Java, and C++. etc, and checking the variables and determining the expressions at runtime.
First, you need to enable debugging and start the process. You can also change the type of debugger to Auto, Native, or Java. You can use the system log to write log messages in the code and work with breakpoints to expedite debugging actions.
Configure Developer Options

You can identify and configure system behavior through developer options, which can debug and profile the app's performance.
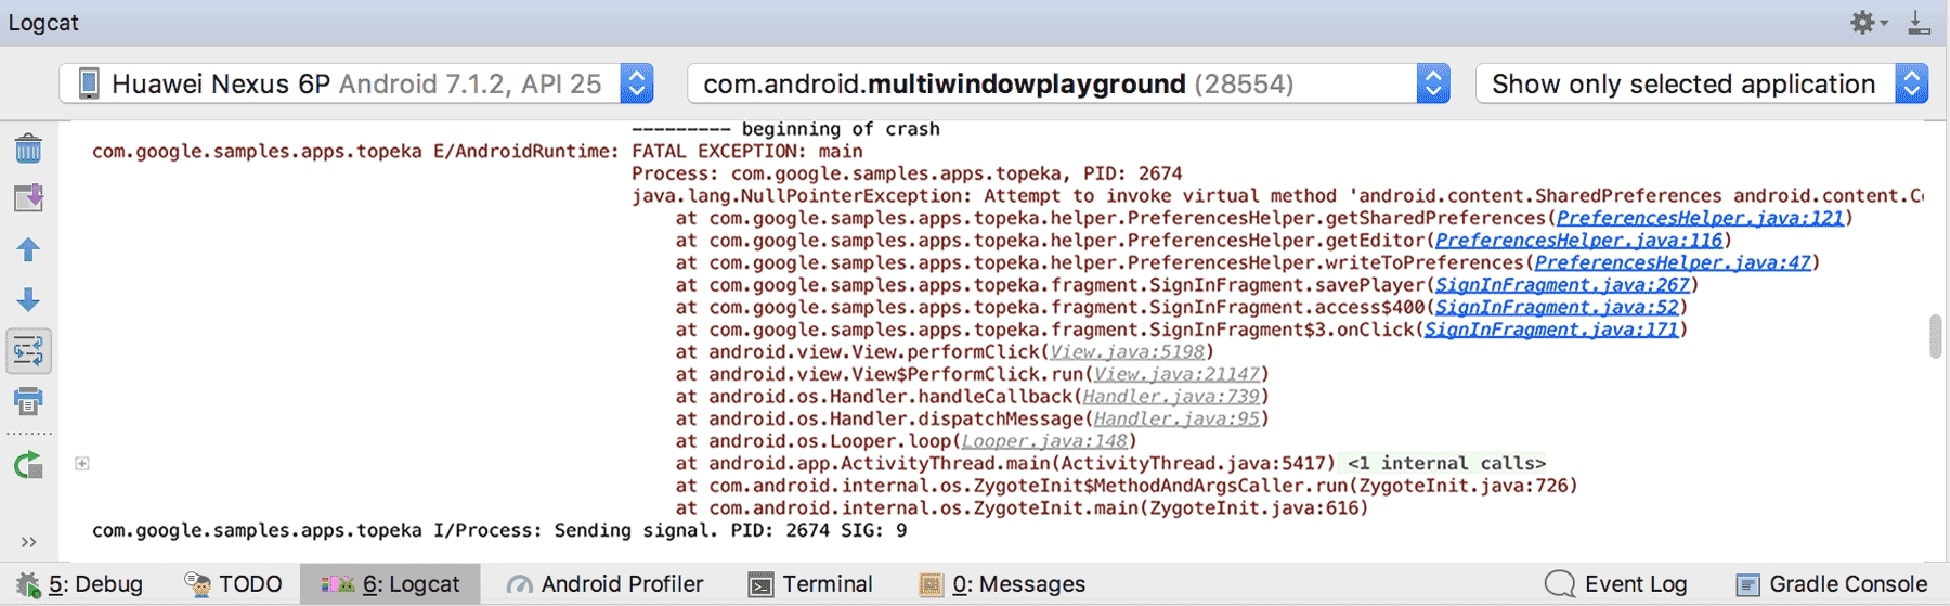
Logcat Helps Write Logs

The logcat shows the system messages like the ones added into the app or during a garbage collection. You can view the messages in real-time and also have a saved history of the older messages. However, if you only want to see selected messages, then you need to create filters and change the information shown on messages or set priority levels.
Analyze Stack Trace
The Google IDE offers an App Quality Insights tool that makes it easier to check the stack trace for top crashes and view the brief stats related to the top crash and non-fatal events. It also helps to filter events based on app version and severity.
Layout Inspector & Layout Validation Debugs Your Layout
You can use a Layout Inspector to view the snapshot-captured data and details of 3D layout rendering, View the component tree, and complete attributes of each user interface component. In short, the features a 3D view of your app. Similarly, the Layout Validation feature displays layouts rendered across multiple device screens
Network Inspector Inspects Network Traffic
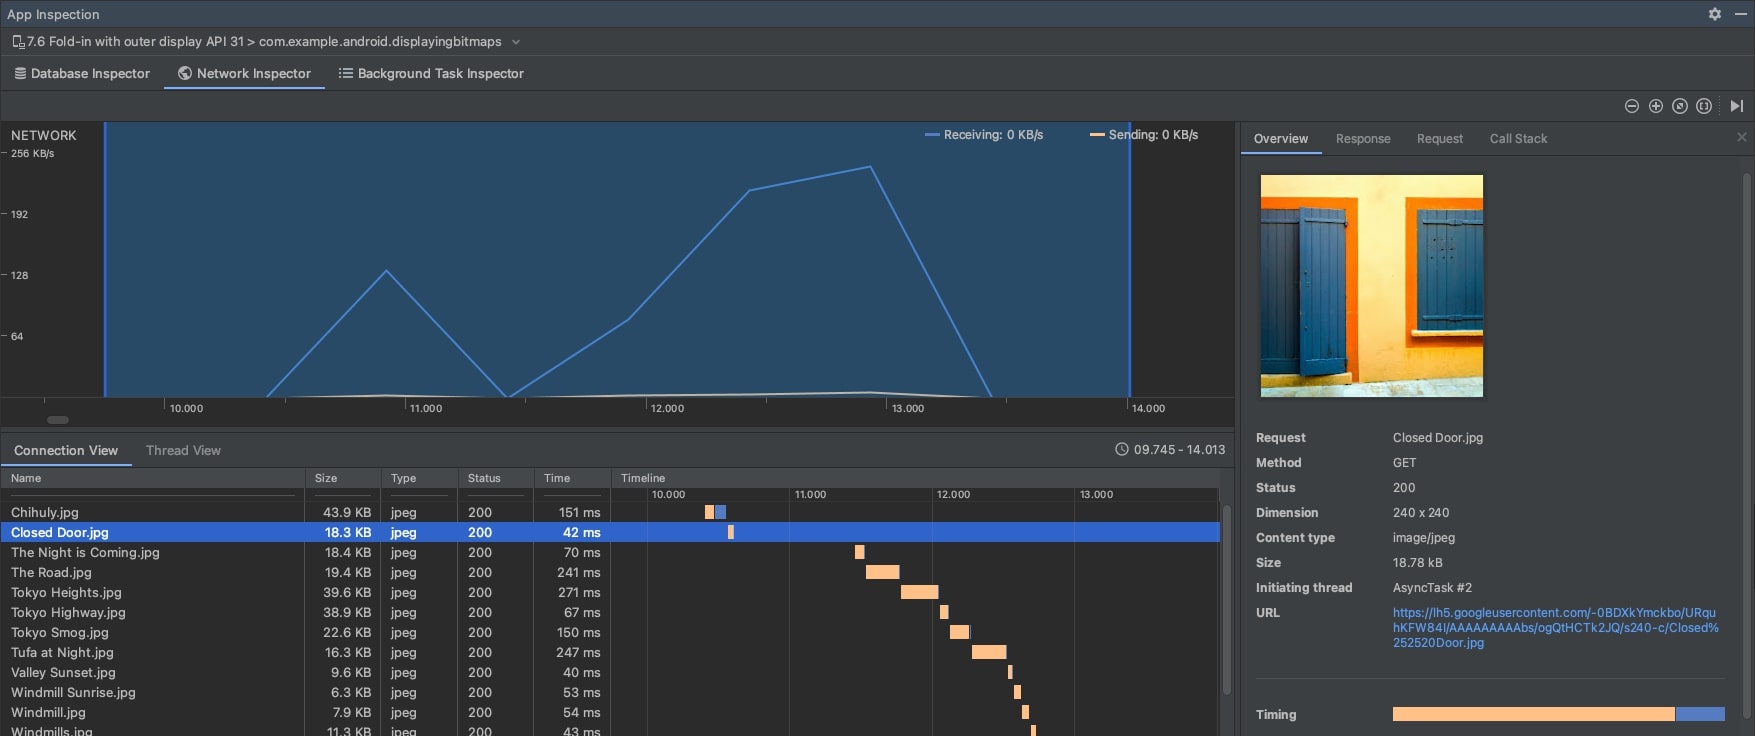
The Network Inspector is available in the menu bar that contains the App Inspection option. It showcases real-time network activity on the timeline and informs how the app transfers data and optimizes the code accurately.
Database Inspects Debugs Database
Database Inspector enables you to evaluate, query, and rectify the application database while it is still running. This becomes helpful in debugging the database. The tool works with libraries and plain SQLite.
Background Task Inspects Debugs WorkManager
Google has enhanced the background task inspector to inspect jobs, alarms, and wakelocks easily. The users can view live information regarding the scheduling of background tasks and go through their detailed execution. The Workers help in tracking and inspecting the scheduled jobs.
View On-Device Files
Android Studio provides a feature known as Device File Explorer that lets you view, copy, and delete files on an Android device. This proves handy if you are looking for a file that you want to transfer to another device.
Debug Pre-built APKs
Now, you can debug pre-built APKs without creating them on the Android Studio platform, provided that you are using version 3.0 or higher. Also, ensure that the debugging activity is enabled.
Take a Screenshot
Almost all Android devices provide the facility of taking a screenshot by pressing the power button and volume down button simultaneously. There is also an alternative way of capturing the screenshot by following a few simple steps where you need to run an app while connecting the device and then open the logcat. In the next step, choose the device and process from the menu and click on screen capture.
Record a Video
Logcat enables you to record a video in the MP4 file format for a maximum of three minutes. You cannot record audio with the video file.
Capture and Read Bug Reports
![]()
(Image -1 Capture a bug report from a device)
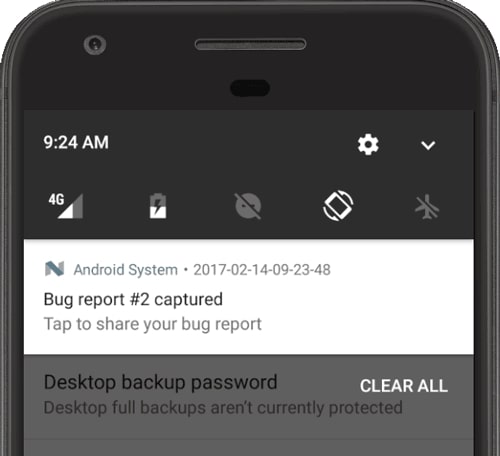
(Image -2 Capture Bug Report from Android Emulator )
Android devices provide a feature called the Take Bug Report Developer option that lets you easily track bug reports and diagnostic information to fix the issues quickly. You can even use the adb bugreport command to capture and read bug reports.
#8. Application Testing
Android Studio offers a variety of tools to easily and quickly carry out different types of application testing, and create, or configure them.
Basic Testing
The first is the basic testing method that includes several features helping to create, run, and analyze tests. You can choose local machines or instrumented tests to run on a device.
Local unit tests are conducted on local Java Virtual Machines and are helpful when you have no Android framework dependencies and want to reduce test execution time. The Instrumented tests are carried out on an emulator or hardware device. Gradle Managed Devices has also released Automated Test Devices (ATD), which is a new Emulator device that optimizes the automated instrumentation tests performance.
Test from Command Line
The command line testing is recommended if you want to target particular modules or build variants for a combination of both. You can directly run the test from the command line and it provides a more refined result. If you are using Android Debug Bridge, you get more customized options for testing the apps.
Advanced Testing
If you think that your application needs some more advanced testing for configuration, you can carry it with the specific tools. These include running instrumental tests on a particular built variant, modifying the built type, and extracting instrumental tests on their own test module.
Other Testing Tools
There are some other test tools as well that you can use to carry out tests. These are Espresso Test Recorder that speeds up the testing process with interactive methods to test common tasks. Then there is App Crawler that automates the test process without writing or managing any code. Monkey Testing is known as stress testing. It tests basic configurations, debugging options, events, frequencies, and much more.
#9. Profile your App
Profiling and benchmarking tools play a vital role in identifying the major app issues, such as slow response, choppy animations, freezing features, etc, and fix the same quickly to improve user experience. Android Studio offers an extensive array of profiling tools like CPU profiler, memory profiler, network profiler, and energy profiler that effectively and swiftly detect potential bottlenecks.
Role of Different Android Profilers
The CPU profiler helps to track performance issues, while the memory profiler monitors the memory consumption. The Network profiler is keeping an eye on the application traffic and the energy profiler helps to optimize battery performance.
Measure the Performance
This is the last step before you finally publish your application. Hence, you have to carefully and thoroughly identify the issues and fix them to optimize the performance of your application. You have to detect the performance-related bottlenecks and analyze the performance metrics.
#10. Using Android Studio to Launch The Application
Android Studio plays a proactive role in the application launching process. Launching or publishing an app means making it available for the end-users. The developers need to focus on two major activities while releasing the application. These include-
- Preparation for the App Release
- Releasing the App to the Users
In the first phase, the developers create a release version of the application, which users can download and install on their different Android devices. While the second phase aims to promote, sell, and distribute the launched app version.
You need to follow the following steps if you are planning to prepare for an app release through Android Studio.
- First, you need to configure the app and other critical settings to fulfill the Google Play Store criteria. In the case of Gradle build files, better use the release build type.
- The second step commences when you start building and signing a release version of the app with the help of Gradle build files.
- In the third step, you have to extensively test the release version of the app on any one target handset device before proceeding with the distribution process.
- Fourthly, you need to make sure that all your application resources are completely up-to-date. The various app resources include graphics and multimedia files. Also, ensure that they are staged through authentic development servers.
- In case the application is based on external servers, please ensure their security and check they are production ready.
Releasing the App on Website or Directly to the Users
Google also provides you with the option of unveiling the application to the users. You can release it on your website or send the app directly to prospective users.
Releasing on the App Marketplace
One of the most common practices of app launching is releasing it through an app marketplace, such as Google Play Store or Galaxy App Store offered by Samsung.
Google Play Store is the official app marketplace and digital distribution service developed and maintained by Google. It enables you to easily distribute your application to a large global audience. Google charges a one-time fee of $25 for releasing the application on the Play Store.
Also, when you publish the app on the Google Play Store, you get an additional opportunity to promote, sell, and distribute your app. You can also unleash the benefit of various developer tools, analyze sales insights, and understand the latest market trends. You can also control the app distribution process and make out how much revenue your app is generating. You can go through user feedback, comments, and ratings in real-time and quickly address issues to improve the overall experience.
(*****Please note that all the above images have been sourced from the official website of the Android Studio User Guide)
Key Android Studio App Development Challenges & Solutions
As a developer, you may have to tackle various common and uncommon Android Studio issues, related to its functionality and operations. Android Studio has honestly highlighted the major challenges and its solutions, which are as follows-
- First, you may get an error message while typing different passwords for Keystore and key. To resolve this issue, you need to use the same password for the key and Keystore.
- If you are using Database Inspector on Android 11 Emulator, you may see your app getting crashed. To avoid this situation, you have to upgrade Android 11 to version 9.0 or higher.
- Is your IDE software not starting after an update? The problem may be with an invalid Android Studio configuration or an incompatible plugin. You need to delete the directory or rename it for backup purposes, based on the Studio’s version and operating system you are using.
- Also, there may be hiccups related to code editing, which you can rectify through command line tools.
- There are issues related to project configuration and app deployment. The viable solution is writing the right codes.
If you are focusing to enhance the user experience, then you should know how to use Material Design components and icons proficiently in your application. You should also be familiar with common UI widgets and work on improving the layout performance.
Core Features of Android Studio
Visual Layout Editor

Using the code ConstraintLayout you can quickly build complex layouts and add constraints from one view to another. It helps you to preview the layout of the app screen size through the selection of different device configurations. You can even resize the preview window.
APK Analyzer

It is a specific feature that allows you to inspect the app content and APK file for minimizing the size of the Android app if you haven’t created the app using Android Studio. Also, you need to check the manifest and DEX files, along with the resources. Make a comparison between the APKs to verify the change in app size between the two versions.
Fast Emulator

Emulators play a significant role in accelerating the speed of your app upon installation on a physical device. The feature offers an augmented reality experience with Google’s ARCore and stimulates different configurations and functionalities.
Intelligent Code Editor

As the name suggests, Intelligent Code Editor helps you to write faster and more accurate codes with minimal errors that improve your overall productivity. You can use this feature to write codes for different programming languages like Java, Kotlin, and C or C++ languages.
Fast Build System

Android Studio offers the Gradle Build that enables you to customize your build and generate its various types for a wide range of devices.
Realtime Profilers

It is an advanced feature that identifies the loopholes in the app performance through inspection of heap and allocations and recording method traces. It also provides real-time statistics for CPU memory and network activity.
(All above images are sourced from the Android Studio Official Website.)
Android Studio Pricing
Android Studio is completely free to download. You need to pay only $25 when you finally release your application on the Google Play Store. Also, you can easily update to the latest version of Android Studio for free.
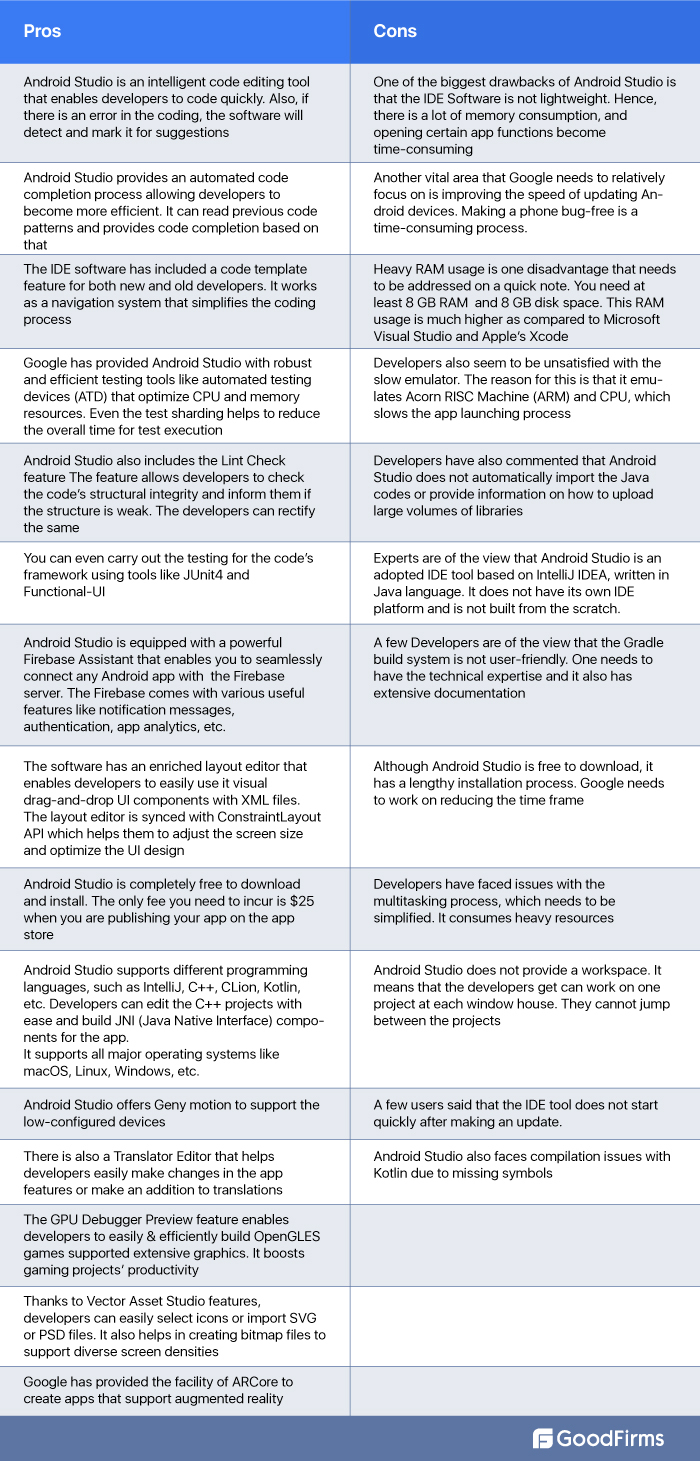
Android Studio: Pros & Cons
System Requirements for Downloading & Installing Android Studio
Android Studio is a free IDE Software that supports or is compatible with all significant cross-platform operating systems, such as Windows, the macOS, and Linux, apart from its own platform Chrome OS.

Downloading Android Studio on Windows OS
- Your system should have Windows 8.0, 8.1, Windows 10, or the latest released Windows 11 with an x86 64-bit microprocessor.
- You must use a second-generation Central Processing Unit (CPU) Intel Core or new generation Advanced Micro Devices (AMD), which Windows Hypervisor supports. Windows Hypervisor, also known as Hyper V, is a hardware virtualization product that seamlessly allows multiple operating systems to run on Windows.
- If your PC works on Windows 10, you require a CPU Intel-core i5 8400 3.0 GHz.
- The system should have a minimum of 8 GB of RAM storage space. If you have more RAM storage, it becomes an advantageous position. If you have Windows 10, the RAM storage space will increase to 16 GB.
- You need to keep a minimum of 8 GB of disk storage free for storing data related to IDE, Android SDK, and Android Emulator.
- The minimum screen resolution required is 1280 x 800. For Windows 10, the screen resolution increases to 1920 x 1080.
Downloading Android Studio on macOS
- You can even download Android Studio on the Mac operating system. The system should be using version 10.14 (Mojave) or higher. But the recommended version is macOS 10.15 (Catalina).
- The CPU requirement is almost similar to that of Windows. You need a CPU Intel-core i5 8400 3.0 GHz or a second-generation Intel Core that supports the new Hypervisor.Framework. You can also use ARM-based chips.
- The minimal memory required is 8 GB of RAM. You also need to free up disk space upto 8 GB and have an SSD.
- The screen is also the same as Windows. It is 1280 x 800, though the recommendation is 1920 x 1080.
Downloading Android Studio on Linux
- Any Linux operating system with a 64-bit microprocessor supports Gnome, Unity DE, and KDE. The system should also have GNU C Library 2.3.1 version or higher.
- The CPU requirement is almost similar to Windows and macOS.
- 8 GB RAM is also recommended for Linux, and the free storage of 8GB. But you can increase the free storage up to 20 GB.
- The screen resolution is the same as above.
Downloading Android Studio on Chrome OS
- Android Studio supports all Chrome operating systems with version 3.5 or higher.
- The Memory requirement is 8 GB or more.
- 4 GB minimum free disk space is also required for data storage. You can increase this limit.
- The CPU needs to be Intel Core i5 or higher. U series or higher is an ideal recommendation.
- A minimum screen resolution of 1280 x 800 is recommended.
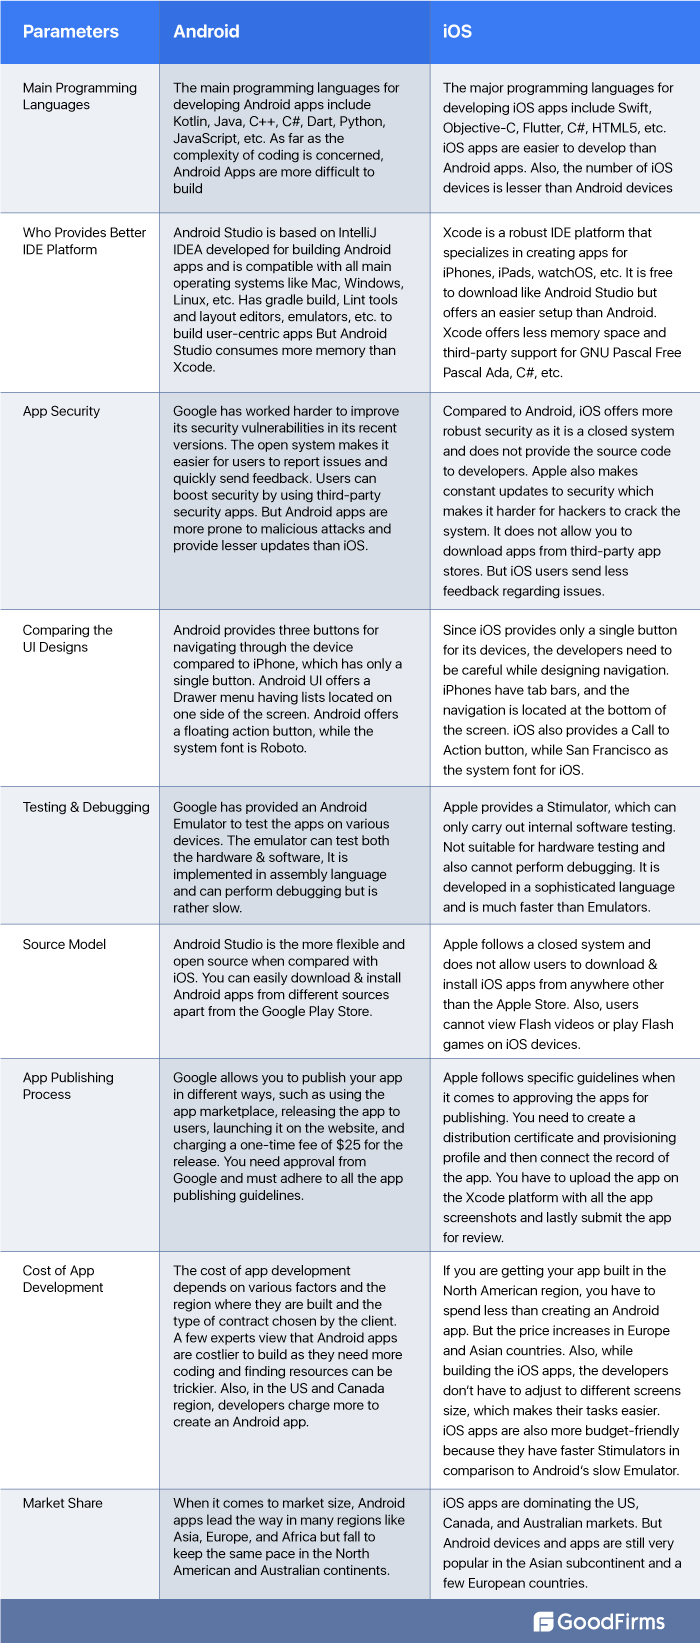
Android Vs. iOS: The Key Differences
Android and iOS operating systems are the two major application development platforms that are currently reigning in the mobile app development market. But you must be familiar that they are also stringent competitors of one another. They share only the basic architecture and a few common functionalities.
Android Studio has a more clumsy and complex ecosystem in comparison to the iOS platform.
But the disparity comes in their development approach, prominent features, development costs, and many more. We have highlighted the differences based on some core parameters.
So, Which Platform is More Promising in 2022: iOS or Android?
Undoubtedly, Android and iOS are leading the global mobile app development market, holding a domitable position with nearly 95% share. But, Android owns the major share with 69.7%, whereas iOS has successfully captured a 25.4% share as of January 2022.
Selecting the Right Mobile App Operating System: The Deciding Factors
Target Audiences
If you want to target more audiences and increase the customer base, go for Android. Android is a more profitable option for businesses targeting Asian and European markets. But if you are specifically targeting the US and Canadian audiences, then iOS becomes a more viable option.
Result: Android Wins, but for the US Market, iOS is the Winner
Addition of Features
If you wish to add any customizable feature or remove any existing one hassle-free, Android is the best platform due to its open source. Google provides more freedom to its developers than Android, which offers a closed system and does not provide the source code to the developers. It becomes challenging to make any changes to the feature. Hence, Android is the clear-cut winner here.
Result: Android Wins due to its flexibility.
App Monetization
It is surprising that iOS races much ahead of Android apps regarding the app monetization process despite having fewer downloads. iOS has provided much-improved results in terms of in-app purchases and app subscription models. Google Play Store has also witnessed significant revenue growth, but it is still lagging behind iOS.
Result: iOS provides better monetization strategies
Better Gaming Experience
Gaming apps are indeed one of the most popular downloaded app categories, generating the highest revenue. iOS applications have dominated this segment with an extensive array of gaming apps containing exciting and interactive features. Apple uses robust and the latest gaming technologies with strict data security and faster navigation to augment the user experience. Android OS provides more free gaming applications, which compromises the quality of apps. Also, it offers less scope for earning revenue than iOS apps.
Result: iOS provides an improved gaming experience.
Total Number of Applications
The reason is apparent. Google has a more lax policy related to publishing apps. In contrast, Apple follows a strict policy related to security, and developers have to abide by all rules and regulations during app submission keenly. Another apparent reason Google Play Store has more apps is that Android devices are much more than iPhones, iPads, and other Apple devices. Google Play Store has nearly 3.48 million apps, while the Apple App Store contains 2.22 million apps.
Result: Android emerges as the winner.
Google Assistant Vs. Siri
Artificial intelligence software is driving the next generation of devices ahead with voice integration functionality. Google Assistant and Apple’s Siri are the most potent and intelligent speech-to-text tools that allow users to search for any information without typing related keywords. Google Assistant is more efficient as it can send early notifications related to meetings or help you find a specific product. Apple has introduced Siri in response to Google Assistant, and it is getting much improved with the release of new iPhone models. But it still has limited features in comparison to Google Assistant. Google Assistant is also available on iPhones.
Result: Google Assistant is much more advanced than Apple Siri
Integration With Other Devices
When it comes to integration with other devices, Apple gets an edge over the Android operating system. iPhone users can easily connect and sync their iPhones with Mac notebooks, iPads, and Apple Smart Watches. This means users can lock and unlock their iPhones with an iPad or Mac notebook. Using the Apple Handoff feature, they can start writing a text on an iPad and complete the same on a Mac notebook. They can make or receive calls on all Apple devices.
Android OS also allows users to integrate different devices and work seamlessly across them. But the major issue is that all the devices - smartphones, tablets, laptops, and smartwatches should be of the same brand; for example, Samsung or Google provide a unified experience.
Result: iOS platform gains the upper hand.
Add-ons
Apple iOS wins the battle against Google Android as it offers an extensive range of add-ons that amplify user experience. Google also provides the same features and services, but Apple offers cross-device sync and improved content compared to Google. The Apple One Service Bundle offers a single subscription for Apple TV, Music, News, Fitness, Arcade, etc., powered by an up-to-date iCloud storage for one month at an affordable price. However, all these services are optional; you may or may not opt for them.
Result: iOS excels over Android by providing better content.
Android or iOS: The Winner
The overall result of this Android vs. iOS competition is that it is a tied battle. There are some elements where Android emerges as a winner over iOS, while iOS gains the upper hand over Android on a few parameters. Hence, the final decision to select Android or iOS depends on specific business requirements and extensive market research.
Notifications Regarding Updates on Android
Whenever Android Studio updates the Integrated Development Environment platform; it sends notifications to all its users and developers through a small dialog box. Developers can even check the updates manually by going to the Help section and then the Check for Updates option.
Alternatively, you can also view the Android Studio updates on four major release channels. These include-
Canary Channel- It is usually a key preview channel where developers release bleeding-edge versions of the application. The product and features are completely new, unveiled on an experimental basis, such that the features are not fully tested and may be unreliable. The Canary channel also provides other preview editions related to the Software Development Kit (SDK) tools, such as Android Emulator. The developers can download this version to try and test the features and provide their valuable feedback on the same. It is not a production development-friendly channel.
Dev Channel- These channels release the applications that have completely passed and survived all levels of internal testing in the canary phase.
Beta Channel- Here, in this phase, the applications get ready for the stable canary build and are released to receive the feedback, before entering into the final phase— the stable channel.
Stable Channel- This channel is the final release destination of an Android application; hence it is also the official stable release from Google, where the app is fully ready to get published on the Google Play Store and downloaded containing all the tested features, user interface, and user experience.
Developers can try the different preview channels alongside the stable version by installing the preview edition.
The Best Android Studio Alternatives
Android Studio contains various drawbacks, such as low emulator functionality, slower reloading of the applications, limited RAM, etc. Also, this IDE software may not be suitable for developing specific applications due to compatibility issues. Hence, GoodFirms has shortlisted a few best alternatives to Android Studio that developers can pick to create outstanding applications. Android Studio’s two biggest competitors - are Microsoft Visual Studio and Xcode from Apple. The other options include Eclipse, IntelliJ IDEA, and NetBeans.
Let’s compare Android Studio with all its popular viable alternatives.
Android Studio VS. Microsoft Visual Studio


Android Studio’s features, functionality, pricing, and usability has been discussed above.
Comparison With Apple’s Xcode


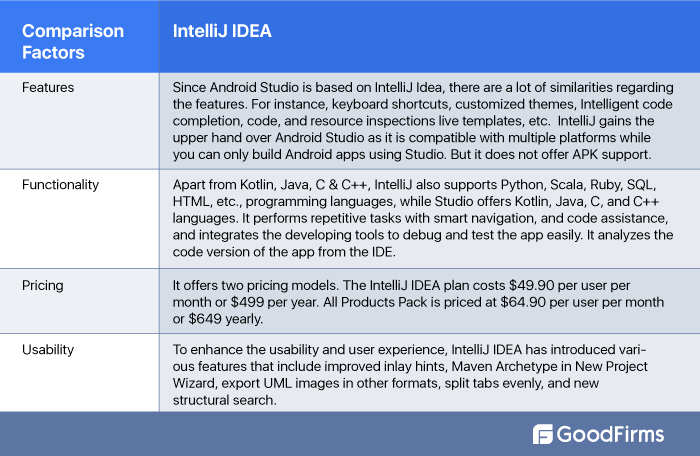
Comparison With IntelliJ IDEA

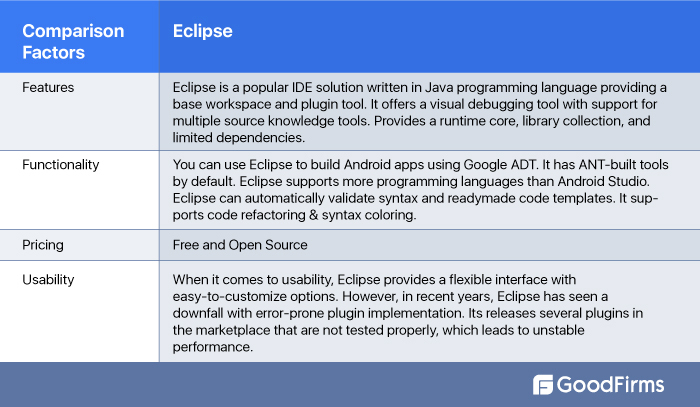
Comparison With Eclipse

Comparison With Apache NetBeans


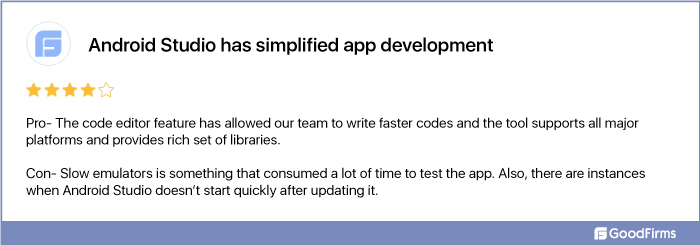
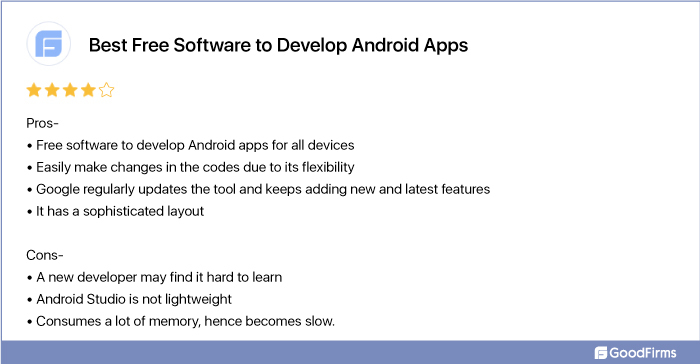
A Few Original Customer Reviews About Android Studio

Is Android Studio the Best Mobile App Development Platform For Android Devices?
Google’s official integrated development environment system, Android Studio, comes with a rich set of features and extensive profiling tools to expedite the application development process. The Java-based IntelliJ IDEA enables developers to easily edit the codes and make changes or upgrade the app features.
Various areas certainly need redressal. Google needs to make the app development software more lightweight and reduce memory and time consumption. It also needs to escalate the speed of app upgradation and Android Emulators to increase the efficiency of app testing and debugging.
Google updates the Android Studio version alongside the Canary and Beta versions, consistently allowing developers to incorporate the latest app development trends and amplify the user experience. Today, it definitely stands as the best mobile app development platform for Android devices.
Will Android Studio Elevate its Capabilities to Create More Productive Apps? GoodFirms’ Final Take

Android Studio is one of the robust and efficient Integrated Development Environment Software that has streamlined and accelerated the app development process by providing a rich set of tools that automate the developer’s tasks. The platform also serves as a code editor, debugger, and compiler.
But the app development tool is also facing tough competition from its arch-rivals - Apple’s Xcode and Microsoft’s Visual Studio. This makes it essential for Google to keep revamping the software with new features and make it more developer-centric.
Google recently made Android Studio more useful and handy for ROM developers and original equipment manufacturers (OEMs). Google claims that after this enhancement, Android Studio will become a complete suite for Android OS development.
Presently, developers use a variety of programming languages to create Android apps, including Kotlin, Java, C++, Rust, etc. The software provides SDKs, the latest versions of emulators, and form factors to optimize the app performance and simplify Kotlin or Java coding.
Google posted a job listing on its website in April that highlighted the company’s aim to include all the projects with Android OS development and enhance the capability of Android Studio.
If Google succeeds in accomplishing its goal, the project will prove more than handy to developers who wish to develop a phone, TV, tablet, or watch on Android. They will also create a new ROM and change the device's Android build.
But at the same time, it will be interesting to note how Google is succeeding in making Android Studio more seamless and streamlining it for ROM and OEM developers.
If you have built an application for any device using Android Studio or are currently creating one, please share your views, experiences, and feedback about the software on GoodFirms’ platform.
Do not miss out on reading reviews about other helpful software that can boost your business prospects. The list includes HubSpot, Xero, Zoho, NetSuite ERP, Salesforce CRM, Zoom, and the recently published review of Microsoft Software.